
Air Combat
Manoeuvres
Energy
(E) is the most important concept in Air Combat Manoeuvres (ACM).
It’s best understood as a dynamic combination of airspeed and
altitude. Airspeed is a measure of an aircraft’s instantaneous
ability to manoeuvre; altitude is a measure of an aircraft’s
potential ability to gain speed quickly by diving.
Together, they comprise a plane’s energy state. Think of airspeed as
cash in your pocket, and altitude as money in the bank. Climbing
reduces your airspeed but increases your stored, potential speed;
diving withdraws speed from your account to be spent manoeuvring
your airplane.
Manoeuvring is the process of exchanging energy for position.
Classic ACM are proven moves, perfected over decades, designed to
gain you the most manoeuvrability for the least cost in energy.
Air combat is perhaps the only contest where it’s both honourable
and desirable to shoot someone in the back. This is the goal of ACM
- to spend your energy to gain a tail shot. There are three good
reasons for this:
1.
The enemy’s guns will not be pointing at you.
2.
With tail shots you do not need to lead the target as much when
shooting.
3.
The tail offers the best position from which to adjust to a target’s
evasive moves.
Many air combat simulations cite classic air combat manoeuvres (ACM)
to create an atmosphere of realism. Knowing authentic ACM in
WWII-Online, however, is not a quaint touch; rather, it is an
essential skill you will need to become successful in the game.
The Simple Aileron Roll
Sideways movement of the stick causes your plane to roll. The
aileron roll is a basic component of every air combat manoeuvre.
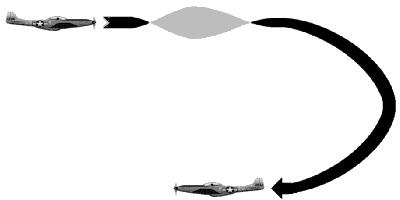
The Loop
This is a full loop and is more an air show manoeuvre than an air
combat manoeuvre. The loop is most effective against very slow
targets, such as heavy bombers, or against fighters that are just
taking off from an airfield.
Loops are rarely this symmetrical in practice and more commonly
resemble a lowercase E.
The Break Turn
The break turn is a hard, flat turn of last resort when you’re under
attack, and it depletes your energy rapidly. It’s an aileron roll
followed by sharp, backward pressure on the stick. The idea is to
get out of the way of an attacker’s bullets as quickly as possible.
Usually pilots employ the break turn when caught by surprise, and
it’s a short-term solution at best. In this illustration, defender B
uses the break turn against attacker A. If you use this manoeuvre,
make sure you turn INTO the attack, if possible. Breaking away from
an attack presents your tail to the enemy.

The Immelmann Turn (Half Loop)
An energy-efficient method of reversing your course, usually to set
up a subsequent shot after making a high speed firing pass, is the
Immelmann turn. This is a half loop - a vertical 180 degree turn -
with an aileron roll at the top.
While it may preserve your energy, it can make your plane an easy
target. Generally, you should avoid using this manoeuvre when enemies
are within gun range.
The Split-S
Also called the Abschwung by the Luftwaffe and the half-roll and
dive by the RAF who also referred to it as the Split Arse, due to
how the manoeuvre feels to the pilot, it is a half loop in reverse.
You use it to attack a target below you and you need a fair amount
of altitude to execute it. Roll the plane inverted, then pull back
on the stick until level.
New players often dive right at lower targets head-on. Not only is
this a bad angle from which to hit the target, it also affords the
target an equal opportunity to hit you. With the split-s, you allow
the bandit to pass below you and then you dive onto his tail. This
requires timing, but it’s an effective move.
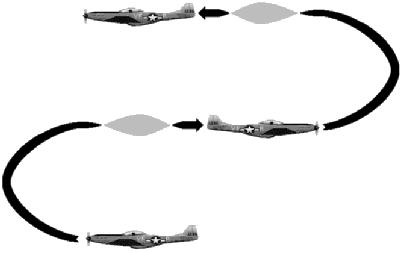
The Vertical 8
The Vertical 8 is two half loops performed one right after the
other. You can accomplish this only if your airspeed is very high.
If a slower bandit tries to follow you, and he isn’t watching his
airspeed closely, he will stall below you, giving you an excellent
opportunity to attack him.
Many players use this principle far more simply. They pull into a
zoom climb after they've drawn the interest of a slower bandit. If
the latter is not paying attention, he'll stall and become a
helpless target. In Air Warrior this is called the rope-a-dope.
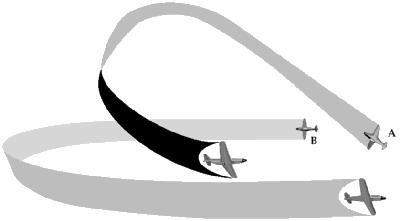
The High Yo Yo
This is perhaps the most difficult
manoeuvre for new players to
understand and use. Attacker A makes a high speed pass on slower
defender B who attempts to evade with a break turn. The attacker
converts his speed into altitude by pulling his fighter into the
vertical. While he does this he rolls his plane so that his cockpit
points in the direction his quarry fled. By pulling back on the
stick as he rolls, he steers his vertical momentum toward the
attacker, allowing him to dive onto the defender’s tail.
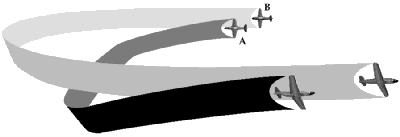
The Low Yo Yo
Here, attacker A is moving slower than defender B. The attacker
closes on his target by diving to convert altitude into airspeed to
cut inside the defender’s turn. This uses the same principle as the
high yo yo, but in an opposite fashion.
With the high yo yo, the attacker converts speed to altitude in
order to reduce his closure rate; in the low yo yo, the attacker
converts altitude to speed to increase his rate of closure.
The Barrel Roll
Similar in principle to the High Yo-Yo, the barrel roll attack is a
climbing turn designed to prevent overshoot, and reacquire an
evading, lower energy target.
The Lufberry
As a variation on the circling fight, the Lufberry Circle of World
War I also found favour in World War II, though pilots had to be
careful in their decision to use the tactic: on one occasion RAF
single-engine fighters managed to get inside a circle of
Messerschmitt Bf 110 twin-engine fighters, and by circling in the
opposite direction to the German aircraft, were able to down a
number of them with hardly a shot fired in return by the Bf 110s,
whose forward firing guns could not be brought to bear, and whose
single flexible machine-guns had little more than nuisance value. So
it was essential in a Lufberry Circle to ensure that one's adversary
could not insinuate himself into the circle, or disaster was almost
inevitable.
The Corkscrew
The most effective tactic to throw off a German night-fighter was
found to be the corkscrew, and if this Manoeuvres were executed
vigorously, there was little chance of the night fighter matching
the bomber and appearing in a firing position at the end of the
Manoeuvre. Faced with a corkscrewing bomber, most night-fighter
pilots sheered off to look for other-aircraft. The difficulty with
such a Manoeuvre for the bomber pilot was timing it, for the
night-fighters were difficult to spot against the dark ground below.
On sighting an enemy fighter, the bomber immediately dived sharply
and turned to port or starboard (in this instance port), losing 1000
ft (305 m) in altitude and increasing speed from about 225 mph (362
kph) to 300 mph (483 kph). Still in its port turn, the bomber was
then pulled up into a climb, half way up which the direction of the
turn was reversed, so that by the time the original altitude and
course had been regained the bomber was down to about 185 mph (298
kph), which often caused the pursuing fighter to overshoot. If the
fighter was still present, the pilot continued to turn, but again
pushed the stick forward to increase speed and dive 500 ft (152 m).
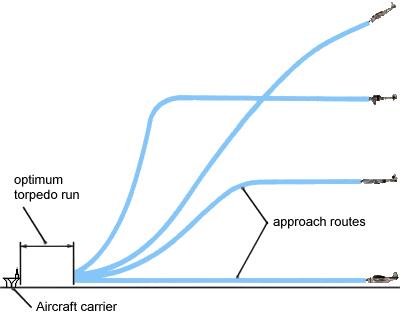
The Torpedo Attacks
Torpedo attacks in World War II varied. The Royal Navy, using
elderly Fairey Swordfish bombers, favoured a medium-altitude
approach, followed by a steep dive at about 175 mph (280 kph) to the
torpedo-release altitude of 150 ft (46 m); the Japanese navy, using
the Aichi D3A 'Val', also favoured a slightly higher approach before
a shallow dive at 286 mph (460 kph) to the release altitude of 197
ft (60m); the US Navy, using Grumman TBF Avenger bombers, used a
low-level approach at 140 mph (225 kph) for a dropping altitude of
between 100 and 200 ft (30 and 61 m); the Germans, using the Heinkel
He 111 bomber modified for torpedo-bombing, used a medium-altitude
approach before a shallow dive at 171 mph (275 kph) to the release
height of 164 ft (50m).
Some of this page was taken from the Air Warrior 3D help manual.
Air Combat Manoeuvres
Energy (E) is the most important concept in Air Combat Manoeuvres (ACM). It’s best understood as a dynamic combination of airspeed and altitude. Airspeed is a measure of an aircraft’s instantaneous ability to manoeuvre; altitude is a measure of an aircraft’s potential ability to gain speed quickly by diving.
Together, they comprise a plane’s energy state. Think of airspeed as cash in your pocket, and altitude as money in the bank. Climbing reduces your airspeed but increases your stored, potential speed; diving withdraws speed from your account to be spent manoeuvring your airplane.
Manoeuvring is the process of exchanging energy for position. Classic ACM are proven moves, perfected over decades, designed to gain you the most manoeuvrability for the least cost in energy.
Air combat is perhaps the only contest where it’s both honourable and desirable to shoot someone in the back. This is the goal of ACM - to spend your energy to gain a tail shot. There are three good reasons for this:
1. The enemy’s guns will not be pointing at you.
2. With tail shots you do not need to lead the target as much when shooting.
3. The tail offers the best position from which to adjust to a target’s evasive moves.
Many air combat simulations cite classic air combat manoeuvres (ACM) to create an atmosphere of realism. Knowing authentic ACM in WWII-Online, however, is not a quaint touch; rather, it is an essential skill you will need to become successful in the game.
The Simple Aileron Roll
Sideways movement of the stick causes your plane to roll. The aileron roll is a basic component of every air combat manoeuvre.
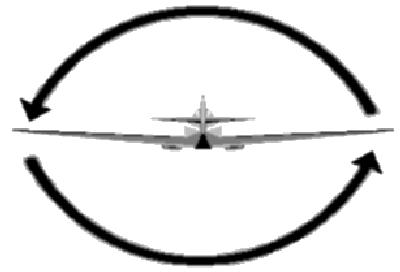
The Loop
This is a full loop and is more an air show manoeuvre than an air combat manoeuvre. The loop is most effective against very slow targets, such as heavy bombers, or against fighters that are just taking off from an airfield.
Loops are rarely this symmetrical in practice and more commonly resemble a lowercase E.
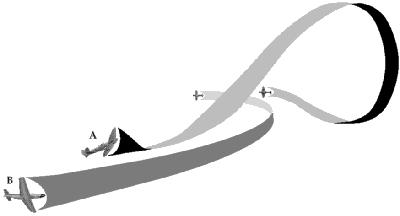
The Break Turn
The break turn is a hard, flat turn of last resort when you’re under attack, and it depletes your energy rapidly. It’s an aileron roll followed by sharp, backward pressure on the stick. The idea is to get out of the way of an attacker’s bullets as quickly as possible. Usually pilots employ the break turn when caught by surprise, and it’s a short-term solution at best. In this illustration, defender B uses the break turn against attacker A. If you use this manoeuvre, make sure you turn INTO the attack, if possible. Breaking away from an attack presents your tail to the enemy.
The Immelmann Turn (Half Loop)
An energy-efficient method of reversing your course, usually to set up a subsequent shot after making a high speed firing pass, is the Immelmann turn. This is a half loop - a vertical 180 degree turn - with an aileron roll at the top.
While it may preserve your energy, it can make your plane an easy target. Generally, you should avoid using this manoeuvre when enemies are within gun range.
The Split-S
Also called the Abschwung by the Luftwaffe and the half-roll and dive by the RAF who also referred to it as the Split Arse, due to how the manoeuvre feels to the pilot, it is a half loop in reverse. You use it to attack a target below you and you need a fair amount of altitude to execute it. Roll the plane inverted, then pull back on the stick until level.
New players often dive right at lower targets head-on. Not only is this a bad angle from which to hit the target, it also affords the target an equal opportunity to hit you. With the split-s, you allow the bandit to pass below you and then you dive onto his tail. This requires timing, but it’s an effective move.
The Vertical 8
The Vertical 8 is two half loops performed one right after the other. You can accomplish this only if your airspeed is very high. If a slower bandit tries to follow you, and he isn’t watching his airspeed closely, he will stall below you, giving you an excellent opportunity to attack him.
Many players use this principle far more simply. They pull into a zoom climb after they've drawn the interest of a slower bandit. If the latter is not paying attention, he'll stall and become a helpless target. In Air Warrior this is called the rope-a-dope.
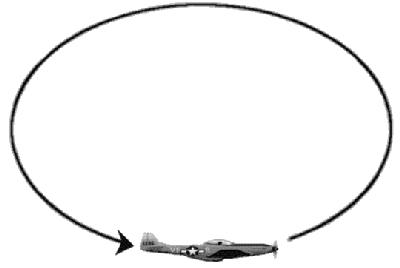
The High Yo Yo
This is perhaps the most difficult manoeuvre for new players to understand and use. Attacker A makes a high speed pass on slower defender B who attempts to evade with a break turn. The attacker converts his speed into altitude by pulling his fighter into the vertical. While he does this he rolls his plane so that his cockpit points in the direction his quarry fled. By pulling back on the stick as he rolls, he steers his vertical momentum toward the attacker, allowing him to dive onto the defender’s tail.
The Low Yo Yo
Here, attacker A is moving slower than defender B. The attacker closes on his target by diving to convert altitude into airspeed to cut inside the defender’s turn. This uses the same principle as the high yo yo, but in an opposite fashion.
With the high yo yo, the attacker converts speed to altitude in order to reduce his closure rate; in the low yo yo, the attacker converts altitude to speed to increase his rate of closure.
The Barrel Roll
Similar in principle to the High Yo-Yo, the barrel roll attack is a climbing turn designed to prevent overshoot, and reacquire an evading, lower energy target.
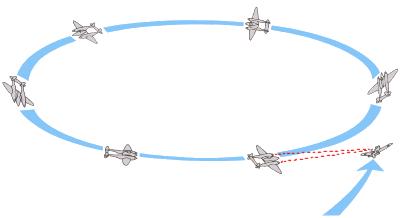
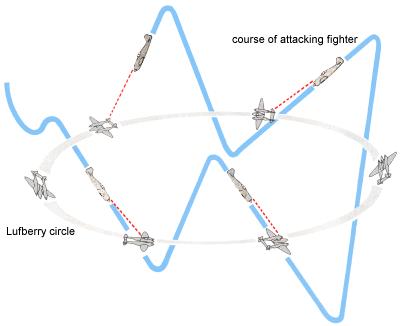
The Lufberry
As a variation on the circling fight, the Lufberry Circle of World War I also found favour in World War II, though pilots had to be careful in their decision to use the tactic: on one occasion RAF single-engine fighters managed to get inside a circle of Messerschmitt Bf 110 twin-engine fighters, and by circling in the opposite direction to the German aircraft, were able to down a number of them with hardly a shot fired in return by the Bf 110s, whose forward firing guns could not be brought to bear, and whose single flexible machine-guns had little more than nuisance value. So it was essential in a Lufberry Circle to ensure that one's adversary could not insinuate himself into the circle, or disaster was almost inevitable.
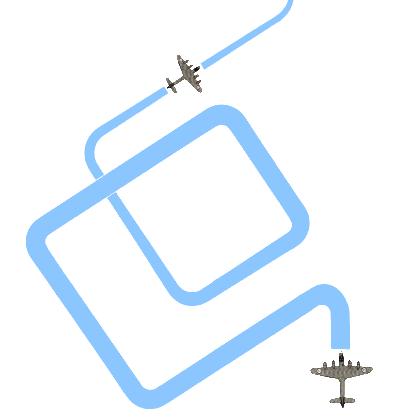
The Corkscrew
The most effective tactic to throw off a German night-fighter was found to be the corkscrew, and if this Manoeuvres were executed vigorously, there was little chance of the night fighter matching the bomber and appearing in a firing position at the end of the Manoeuvre. Faced with a corkscrewing bomber, most night-fighter pilots sheered off to look for other-aircraft. The difficulty with such a Manoeuvre for the bomber pilot was timing it, for the night-fighters were difficult to spot against the dark ground below.
On sighting an enemy fighter, the bomber immediately dived sharply and turned to port or starboard (in this instance port), losing 1000 ft (305 m) in altitude and increasing speed from about 225 mph (362 kph) to 300 mph (483 kph). Still in its port turn, the bomber was then pulled up into a climb, half way up which the direction of the turn was reversed, so that by the time the original altitude and course had been regained the bomber was down to about 185 mph (298 kph), which often caused the pursuing fighter to overshoot. If the fighter was still present, the pilot continued to turn, but again pushed the stick forward to increase speed and dive 500 ft (152 m).
The Torpedo Attacks
Torpedo attacks in World War II varied. The Royal Navy, using elderly Fairey Swordfish bombers, favoured a medium-altitude approach, followed by a steep dive at about 175 mph (280 kph) to the torpedo-release altitude of 150 ft (46 m); the Japanese navy, using the Aichi D3A 'Val', also favoured a slightly higher approach before a shallow dive at 286 mph (460 kph) to the release altitude of 197 ft (60m); the US Navy, using Grumman TBF Avenger bombers, used a low-level approach at 140 mph (225 kph) for a dropping altitude of between 100 and 200 ft (30 and 61 m); the Germans, using the Heinkel He 111 bomber modified for torpedo-bombing, used a medium-altitude approach before a shallow dive at 171 mph (275 kph) to the release height of 164 ft (50m).
Some of this page was taken from the Air Warrior 3D help manual.